Ramesses II developed what can only be described as an extraordinary building activity during his 67-year reign. He
enjoyed having his state sculptors depict him repeatedly and there is hardly a pylon, hall or chamber in the temples of
Egypt that does not bear his name. His monuments, mostly massive, spread from Memphis and Heliopolis to Abydos and
Thebes, apart from those in the heart of Nubia. His image is also perpetuated in gigantic detail in the rocks of Asia.
One can imagine with what joy his sculptors presented ostentatious projects that they were sure would be accepted. The
image of Ramesses II is more indelibly projected into the modern age than any other. His favourite theme was his famous
alliance with the King of the Hittites. It is in fact depicted on the great pylon that forms the eastern entrance to the
Ramesseum. This campaign was the Pharaoh's only really important one in Asia over some fifteen years, though he was also
responsible for suppressing some Nubian revolts and carrying out a campaign in Libya.
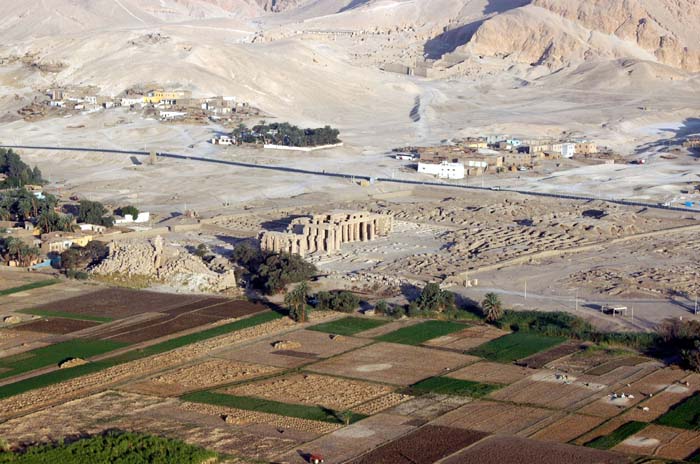
 The entire structure of the
Ramesseum within the girdle-wall measures approximately 275 metres by 168 metres, though a large portion consisted of
subsidiary buildings and storerooms.
The entire structure of the
Ramesseum within the girdle-wall measures approximately 275 metres by 168 metres, though a large portion consisted of
subsidiary buildings and storerooms.
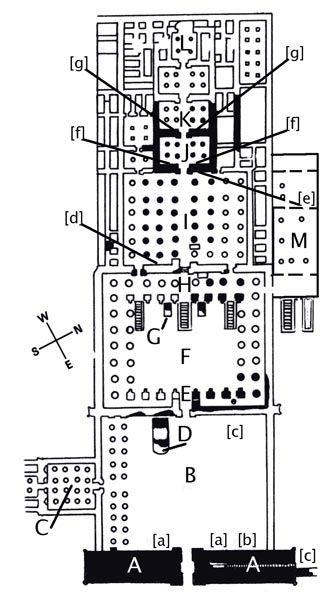
Entrance Pylon
The murals on the inner surfaces of the entrance pylon show, on the northern tower [a right] towards the centre of
the wall (lower rows), the Egyptian army on the march with infantry and charioteers. The Egyptian camp is shown above
them with a rampart of shields. This is a lively scene with the chariots drawn up in long lines and heavy baggage-wagons
with their teams nearby. Some of the un-harnessed horses are being foddered. Some of the soldiers converse with one
another. One drinks from a wineskin. Two others quarrel. The scene to the right of this same tower shows Ramesses II
seated on his throne taking counsel with his princes who stand before him. Below him is a row of captured spies being
beaten to extract information.
On the southern tower [a left] the actual attack is shown. The entire left-hand side of the pylon shows the battle of Kadesh. Ramesses II dashes into battle in his chariot, dead and wounded cover the ground, others retreat in confusion only to fall headlong into the Orontes, the Hittites take refuge in their fortress. The reliefs on the right-hand half of the tower show the Pharaoh grasping enemies by the hair whilst smiting them.
First and Second Courts
The first court of the Ramesseum (B) is mostly in ruin. Towards the rear, before the ancient western gate, lie the remains of what was once a colossus of the king and one of the most enormous pieces of stone ever shaped to such perfection (D). This massive statue, or rather the remains of the chest, upper arm, foot, etc., shows work of superb craftsmanship even to the final polish. When the French expedition under Napoleon visited Egypt careful measurements were made of the various remaining parts and it was estimated that the statue's total height must have been over 17 metres and its weight over 1,000 tons. In other words this granite statue not only exceeded in size the Colossi of Memnon, but also most of the statues of Ramesses' ancestors. Its transportation from the granite quarries of Aswan in one piece is almost impossible to conceive. Hatshepsut's obelisks at Karnak were only one third of the weight. The Statue was named "Sun of Princes" and was originally flanked by the statue of him mother Tuya.
On passing the colossal remains we enter the second court (F) which is in a much better state of preservation. It has colonnades on all four sides, those to the rear on a terrace. Facing the court are statues of Osiris and the representations on the column shafts show Ramesses II sacrificing to the deities. This court was the one identified with the Augustan historian Diodorus' description of the 'Tomb of Ozymandias'. 'Ozymandias' may be explained as a corrupt form of User-ma-re, one of the names of Ramesses II. The two colossal monoliths of the king, which must once have towered over the pylons of the Ramesseum, inspired Shelley to write his famous poem Ozymandias.
- Ozymandias,
- Percy Bysshe Shelly (1792 - 1822)
I met a traveller from an antique land,
Who said: Two vast and trunkless legs of stone
Stand in the desert… Near them, on the sand,
Half sunk, a shattered visage lies, whose frown,
And wrinkled lip, and sneer of cold command,
Tell that its sculptor well those passions read
Which yet survive, stamped on these lifeless things,
The hand that mocked them, and the heart that fed;
And on the pedestal, these words appear:
"My name is Ozymandias, King of Kings,
Look on my Works, ye Mighty, and despair!"
Nothing beside remains. Round the decay
Of that colossal Wreck, boundless and bare
The lone and level sands stretch far away."
In this court are well preserved scenes of the battle of Kadesh (c). Ramesses II dashes into battle (lower row). He is depicted larger than his men, and the enemy, mostly dead and wounded, lie in heaps on the ground. The fortress of Kadesh, surrounded by a moat, divides a group of the enemy from the battlefield. These men, far from preparing themselves for battle, are lending a hand to their drowning companions. Though this mural has been considered by some as a pretentious interpretation, there is no doubt that the complexity of the composition shows development and sophistication. The individual figures, however, indicate marked deterioration from the expressive detail of the murals of Seti I's mortuary temple.
- Higher on the wall (c) are scenes from the Festival of the God Min
which was celebrated when the Pharaoh came to the throne. The priests, who stand to the side of the king and await a
procession headed by other priests carrying images of the royal ancestors, let forth four birds to carry the royal
tidings to the four corners of the earth. Further to the right the Pharaoh cuts a sheaf with a sickle for presenting to
the god. Murals portraying such festivals are immensely effective. The artists' ability to depict battle action is less
so in view of the stylized treatment of the human form.
At the back of the court are some stairs, and on the rear wall to the left (f) are three rows of relief work. The bottom row depicts Ramesses II as a family man with his eleven sons. The middle row (left) shows the hawk-headed Montu holding the hieroglyph for life before the king's face and (right) the king kneels before the Theban triad while Thoth, who is behind him, writes his years on a palm-leaf. In the top row he is making a sacrifice to Ptah and offering incense to Min.
- Hypostyle Hall
The Hypostyle Hall (I), which follows a small flight of stairs at the centre back of the court, is markedly similar to the one at Karnak. Both have three aisles, the taller columns at the centre with calyx capitals and the lower ones at the sides with bud capitals. As at Karnak the difference in height is made up by a wall with openings for light. The hypostyle hall of the Ramesseum is less cumbersome than that of Karnak. The columns appear more graceful and better proportioned. Throughout the hall the representations depict Ramesses II in battle. This time the troops with ladders storm the fortress of Zapur (g-lower row). The Pharaoh dashes into the thick of battle in his chariot (to the left), leaving the enemy in flight or scattered on the ground. To the right the attacking Egyptians scale the fortress on ladders and push up to the walls under the protection of storming-sheds and shields. The sons of the Pharaoh took part and proved themselves worthy of their heroic father. Each is identifiable by his name engraved beside him.
On the western walls [e] the sons of Ramesses II are shown (in the lower rows). Above them the Pharaoh is followed by a goddess in the presence of Amun and Mut. Above the princes he is depicted before Amun and Khonsu with the lion-headed Sekhmet behind him.
Smaller hypostyle halls
Beyond the hypostyle hall are two smaller hypostyle halls falling one behind the other in the middle of the remaining chambers which spread backwards and sideward from the few standing walls. The first (J) has astrological representations on the roof and on the eastern walls [f] priests bear the sacred boats of Amun, Mut and Khonsu, each decorated with the head of its god. On the rear right-hand wall Ramesses is seated beneath the sacred tree of Heliopolis, on the leaves of which his names are being written by Atum, who is seated on a throne to the left, with a goddess and Thoth to the right.
The second hypostyle hall (K) is mostly in ruin. It has some sacrificial representations including a scene [g] of Ramses burning incense to Ptah and the lion-headed Sekhmet.
The Portrayal of Ramesses II
When looking at the murals of the Ramesseum, recording the wars of conquest and aggrandisement, one cannot help recognising this as a very early form of mass persuasion. On no monument, wall, column or pylon, is there a record of a single governmental setback, neither through internal ferment nor through military defeat. The Pharaoh is always a hero. His chronicles are always glorious. And none are more glorious than those of Ramesses II. According to his royal scribe, Pentaur, when he and his chariot driver were separated from the army and hopelessly surrounded by the enemy, the fearless Ramesses II six times charged the foe single-handed. He hewed them down with his sword and trampled them under the wheels of his chariot. According to Pentaur, Ramesses overthrew 2,500 enemy chariots, scattered 100,000 warriors and drove the rest into the water!
Ramesses II's feats on the home front do not have to be exaggerated. They stand today as proof of his abilities. He was the Pharaoh who dug out the heart of a mountain at Abu Simbel in order to fashion within it a great hall and no less than fifteen spacious chambers. He faced the hollowed construction with four carved colossi that, even in a seated position, tower to a height of 20 metres. Ramesses II will always remain a central figure in Egyptian history and one that can be forgiven for claiming full credit, here and there, for work begun by his ancestors.
- Source: Luxor, a Guide to Thebes; Jill Kamil; 1973
-
Contact & Feedback : Egyptology and Archaeology through Images : Page last updated on 21-November-2025 :