-
 Stirling Stirling
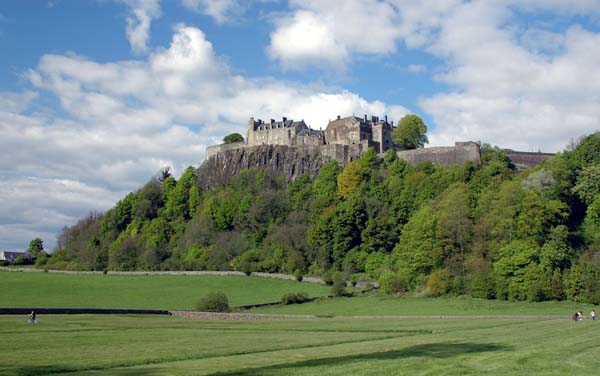
- Stirling Castle is set at the very heart of the
kingdom, on a high volcanic rock, it commands the countryside. Before the
marshes to its west were drained and the network of roads and railways
around its base was developed, its situation was even more commanding, and
whoever possessed the castle was well placed to control all movement
throughout the centre of Scotland. Not for nothing was it likened to 'a huge
brooch clasping Highlands and Lowlands together'.
"There was a favourite royal castle here from at least the twelfth century -
and possibly for long before then - and its role in both peace and war is
central to much of the story of medieval Scotland. Without the castle, for
example, there would have been no need for William Wallace to fight the
battle of Stirling Bridge in 1297, or for Robert I (the Bruce) to fight at
Bannockburn in 1314.
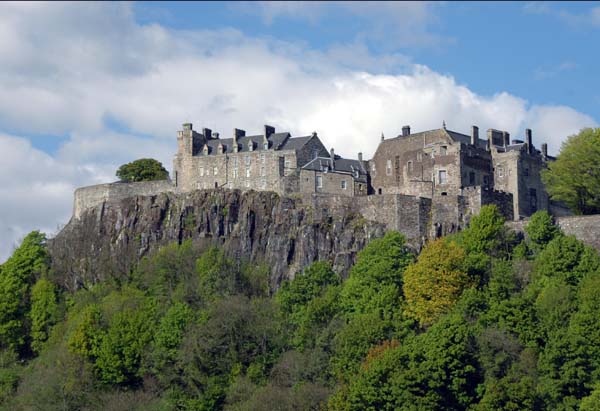
However, the buildings are all
later than that, dating mainly from the late 1400s and the 1500s, when the
castle was perhaps the most ambitiously planned of the settings for the
court of James IV, James V and James VI. Despite several centuries of
adaptation to military use after James VI moved south to become James I of
England in 1603, the buildings raised for those monarchs survive remarkably
well. They offer an unequalled impression of the architectural backdrop
against which a dynasty of medieval and Renaissance monarchs both governed
their kingdom and made their mark on the European scene.
-
 Outcrop
of rock Outcrop
of rock
- The castle rock came into existence roughly 350
million years ago as a layer of molten rock forced up from a distant
volcanic fissure, and which flowed outwards between layers of hard rock
before rising upwards at what is now Stirling. By the start of the last Ice
Age, about one and a half million years ago, the rock may already have begun
to emerge as a significant landscape feature, but it was the movement of ice
which fully exposed the edge of the sill. The scouring action of ice sheets,
moving from north-west to south-east, created sheer faces along the rock's
western side and northern end. As the ice melted, an inlet of the sea formed
around the rock, but layers of clay, and then of peat, built up to form vast
tracts of marshland to the west of the rock, through which the River Forth
meandered out to the gradually withdrawing sea. Confining these marshlands -
the Flanders, Blairdrummond and Drip Mosses - were the Ochil Hills to the
north-east of the rock, and the Gargunnock and Touch Hills to the
south-west.
Mosses have been drained over the last two centuries, and the resultant rich
farmland now presents no barrier to movement. But throughout the Middle Ages
the combination of marshes, high hills and a major river restricted
communication routes. Until recently many of the main land and water routes
running both north-south and eastwest through central Scotland had to pass
directly below the castle rock, and whoever controlled Stirling controlled
much of the country. The combination of an almost impregnable rock site and
a location of such high strategic significance made Stirling an irresistible
situation for a major castle.
- Legendary Beginnings
It is not known when the castle rock was first occupied and defended.
Since prehistoric forts have been found on a number of other hills in the
vicinity it is possible there was also an early fort here, though no
evidence of this has vet been found. The rock could have been a stronghold
of a northern enclave of the British people known as the Gododdin, the
successors of the tribe called the Votadini by the Romans. But by the
seventh century the area had come under the control of the Anglians of
Northumbria, and in 654 Penda, King of Mercia (in what is now central
England) is said to have chased the Anglian King Oswy as far as a place
called Iudeu. Some historians have suggested that Iudeu was Stirling. With
the defeat of the Anglian King Ecgfrith by the Pictish King Brude at
Nechtansmere, near Forfar, in 685, the area presumably came under Pictish
control, until both Picts and Scots were progressively forged into a single
state from around the mid-ninth century onwards. As part of this process, it
was said in the later Middle Ages that a stronghold here was besieged by
Kenneth mac Alpin, who had become King of the Scots in 842.
- The First Fortress
It is only from the early twelfth century that things become more
certain. The first definite pointer to the existence of a castle comes at a
date between 1107 and 1115, when Alexander I arranged for a castle chapel to
be dedicated and endowed. The castle was presumably one of his favourite
residences, because he died within it in 1124.
A royal castle like Stirling had to meet a wide range of requirements. Apart
from being a place of defence, it was a residence for the king and his
court, with a need for both accommodation and entertainment. It also had to
house the administrative officers who travelled with the king to assist him
in governing the kingdom from wherever he chose to base himself. However, we
know little about the layout or appearance of the castle at this date. With
the possible exception of the chapel, it is likely that most of the
buildings and defensive walls were of timber, earth and thatch.
Later in the century Stirling's continuing importance was demonstrated when,
following King William the Lion's capture on a raid into England in 1174, it
was one of five castles surrendered to Henry 11 of England under the Treaty
of Falaise as the price of William's freedom. The terms of that humiliating
treaty were eventually overturned in 1189, and it was at Stirling Castle
that William died in 1214.
-
 Wars
of Independence Wars
of Independence
- The phase of its history for which Stirling Castle
is most widely remembered is the late thirteenth and early fourteenth
century, when it played a central role in the resistance to English attempts
to dominate Scotland. The accidental death of Alexander III in 1286,
followed by the death of his granddaughter and only direct heir, Margaret,
'Maid of Norway', in 1290, left Scotland without a single claimant to the
throne, and Edward I of England was called in to adjudicate between the
various contenders. Edward briefly stayed at Stirling in 1291 while
arrangements were being made for the Scottish nobility to accept his role,
and in 1292 at Berwick judgement was given in favour of John Balliol. But
after King John refused to support Edward I in his wars with France in 1295,
Edward swept north in the following year on a punitive campaign, during
which John was deposed. As part of the same campaign Edward took Stirling
Castle, and it was the Scottish determination to regain the castle which led
to the Battle of Stirling Bridge in 1297. Unfortunately, this famous victory
was followed by the loss of the castle to the English in the next year,
after the Scottish defeat at Falkirk.
Nevertheless, the Scots were again besieging the castle in 1299, and the
English constable, John Sampson, was forced to surrender when no relief
appeared. But by 1303 the wheel of fortune had turned yet again, and
Stirling was the only significant stronghold remaining in Scottish hands,
making Edward I more determined than ever to retake it. He had floating
bridges made at King's Lynn, in Norfolk, to allow him to cross the Forth
below Stirling and, once at Dunfermline, he started building at least 17
great siege engines. The siege began in April 1304, and eventually the
castle's captain, Sir William Oliphant, offered surrender on 20 July, though
Edward I insisted that some of the garrison remain within the castle until
he had tried out his most favoured siege engine, 'the war wolf', which
probably fired heavy stones.
- The Battle of Stirling Bridge, 1297
Early in September the Scottish army, led by William Wallace and
Andrew Murray, took up position on Abbey Craig, overlooking the timber
bridge over the Forth, a short way upstream of the present bridge. They
bided their time, knowing that the English, under the command of the
Earl of Surrey, had at some stage to cross that bridge. Eventually, on
11 September, the English began to cross. Wallace and Murray held off
until the enemy were well on the bridge, and then they gave the order to
charge. The English cavalry, struggling two abreast across the narrow
causeway, were caught in the trap. Some were killed outright, others
were drowned, and only a lucky few got away. Hugh Cressingham, Edward I
of England's Treasurer, was killed and his body skinned. Andrew Murray
was also badly injured in the battle and died of his wounds that
November, and William Wallace lost his next battle against the English,
at Falkirk, the following summer.
-
 A
combination of the death of Edward I in 1307 and the inspired leadership of
Robert I led to a rapid improvement in Scottish fortunes. By 1313 only the
castles of Stirling, Edinburgh, Berwick and Bothwell remained in English
hands, and Robert's younger brother, Edward, laid siege to Stirling,
captained by Sir Philip Moubray. However, Edward Bruce lifted the siege on
the understanding that the castle would be handed to the Scots if not
relieved by the English before Midsummer's Day of 1314. It was Edward II's
determination to retain Stirling which led to the Battle of Bannockburn on
23/24 June 1314, and which gave the Scots one of their finest victories. By
this stage, however, Robert considered that the best policy was to render
all castles indefensible, to avoid the risk of their being held against him,
and this was done at Stirling after Bannockburn. A
combination of the death of Edward I in 1307 and the inspired leadership of
Robert I led to a rapid improvement in Scottish fortunes. By 1313 only the
castles of Stirling, Edinburgh, Berwick and Bothwell remained in English
hands, and Robert's younger brother, Edward, laid siege to Stirling,
captained by Sir Philip Moubray. However, Edward Bruce lifted the siege on
the understanding that the castle would be handed to the Scots if not
relieved by the English before Midsummer's Day of 1314. It was Edward II's
determination to retain Stirling which led to the Battle of Bannockburn on
23/24 June 1314, and which gave the Scots one of their finest victories. By
this stage, however, Robert considered that the best policy was to render
all castles indefensible, to avoid the risk of their being held against him,
and this was done at Stirling after Bannockburn.
As so often, Scottish good fortune was not sustained. Robert I's heir at his
death in 1329 was his five year-old son, David II, and in 1332 the son of
John Balliol, Edward, took advantage of the new king's youth to invade the
kingdom, with the support of Edward III of England and those Scottish nobles
earlier dispossessed for disloyalty by Robert I. Stirling was again under
English control from at least 1336, when its warden was Sir Thomas Rokeby,
and much building and strengthening work was then carried out. Andrew Murray
(whose father, also Andrew Murray, was Wallace's co-leader at Stirling
Bridge) laid an abortive siege in 1337, though it was only in 1342 that it
was eventually retaken for the Scots, by Robert the Steward.
- The Battle of Bannockburn, 1314
The Scots had given the English a deadline of Midsummer's Day to
relieve their beleaguered garrison in the Stirling Castle or have them
surrender. Edward II took up the challenge and crossed the River Tweed
on 17 June at the head of a 20,000 strong army. King Robert (the Bruce)
mustered his smaller force near Bannock Burn, a little to the south of
Stirling, and waited. On Sunday 23 June, the English vanguard, under the
Earl of Hereford, approached the Scottish lines and charged. One of the
earliest encounters was between the Bruce himself and Henry de Bohun,
and the sight of their King splitting open the skull of the Earl of
Hereford's nephew with his battleaxe moved the Scots to repulse the
attack. The two sides then drew back to their positions.
- Bruce would have retired altogether from the fray
had he not received word during the night that the English camp were utterly
demoralised by the day's events. On the following morning, Midsummer's Day,
the Scottish schiltrons (large formations of pike-wielding infantry)
advanced and wreaked havoc. The English, finding themselves trapped between
the Bannock Burn and the River Forth, were thrown into utter confusion. Many
were drowned, others were cut down either by their pursuers or by their own
comrades desperate to get away. Edward II contrived to reach the safety of
Stirling Castle and eventually escaped back to England. Robert the Bruce had
pulled off one of the greatest military victories in Scottish history.
- Castle in the Later Middle Ages
In the later Middle Ages there are many records of major building work,
and there is more than ever a sense that Stirling and its castle were at the
heart of the nation's affairs. Robert the Steward succeeded David II to the
throne in 1371, as Robert II, and during his time much attention was paid to
the castle's defences. Indeed, the earliest part of the castle to survive
above ground, the core of the North Gate, was probably under construction
during his reign, in 1381.
A role which was to become increasingly important for the castle was that of
royal nursery. After James I returned from England in 1424 (he had been a
captive there since 1406), he granted the castle to his queen as part of her
marriage settlement, and this was also to be done by many of his successors
on the throne. Less attractively, Stirling was where James I settled some of
his scores against those he felt had done too little to obtain his release.
The main culprit was his uncle, Robert Duke of Albany, who had been Governor
of the kingdom in his absence, but as he had died at Stirling Castle in
1420, James' wrath was instead directed against his son, Murdoch Duke of
Albany. Following a session of parliament at Stirling on 24 May 1425,
Murdoch and two of his sons were beheaded on the castle hill. James I's
continuing high-handed behaviour was a factor in his assassination in 1437,
after which there is a tradition that Queen Joan smuggled the six-year old
James II to Stirling in a chest. However, she herself was to undergo a
period of undignified imprisonment within her castle after her second
marriage two years later.
Although little building is recorded during the reign of James II, Stirling
was still a much-used royal residence. In 1449, the year of the King's
marriage to Mary of Guelders, a niece of the Duke of Burgundy, the castle
was the setting for a tournament in which the main protagonists were two
Burgundian knights, Simon and Jacques de Lalain, and two members of the
Douglas family. Three years later, however, the head of the Douglas family,
William, eighth Earl of Douglas, was murdered by James II's own hand within
the castle. This act was regarded as particularly reprehensible since the
Earl had been invited to the castle under the King's special protection, in
order to persuade him to break alliances felt to be against the royal
interest. The King was unable to control his anger when Douglas refused to
comply. Traditionally this murder is located in the King's Old Building,
which in fact had not been built by then.
James III commissioned more building than his father. Accounts show he was
at work on an unidentified 'white tower' in 1463 and on the castle walls in
1467, and there were major works on the Chapel between 1467 and 1469. In
addition, he was enlarging the royal collection of artillery, some of which
was cast within the castle gun house in 1475. None of his building work
survives in identifiable form.
James III was on poor terms with his wife, Margaret of Denmark, in the later
years of their marriage, and she spent the last three years of her life at
the castle, largely apart from her husband. With her at Stirling was the
young Duke of Rothesay, the future James IV, and he remained there after his
mother's death in 1486. Two years later he was persuaded to leave the castle
to join the magnates who had risen against his father, and this was probably
the most important factor in James III's defeat at Sauchieburn and his
subsequent assassination. When James IV succeeded to the throne, he
confessed his part in his father's death to the head of the castle's chapel.
From then on he is said to have worn an iron belt around his waist as
penance and evidence of his deep remorse.
Burgh of Stirling
A royal castle did not exist in isolation. Many people were required to
service the needs of its occupants, though not all of those lived within the
castle itself. Additionally, the protection afforded by a major stronghold,
particularly when it was set at the junction of important trade routes,
acted as a magnet to craftsmen and those who wished to sell their goods in
peace. Consequently, urban settlements grew up around castles, and at
Stirling the natural place for this burgh was along the sloping main
approach to the castle. As early as the reign of David I (1124-53), the
developing settlement here was given the privilege of royal protection, and
during his reign - if not before - there was a parish
church to meet the spiritual needs of its people.
Stirling has retained many fine buildings from before the time of its modern
expansion. Grandest of all is the parish church of the Holy Rude, which was
rebuilt in two principal campaigns starting around 1414 and 1507, resulting
in one of the most imposing of Scotland's great late medieval burgh
churches. The burgh also had several other churches, including friaries for
the Dominicans and Observant Franciscans, the chapels of at least five
hospitals, and the Augustinian abbey of Cambuskenneth in the valley to the
east.
 Of
these churches only
Holy Rude and Cambuskenneth Abbey still have visible remains, though
something of the Dominican church is known from excavations. Other partly
pre-Reformation buildings include the four-arched bridge over the Forth, and
parts of the town wall. The present bridge is probably largely of the
sixteenth century, though we know that the earliest bridges here were of
timber, and a short way upstream. The remaining parts of the wall along the
south and west sides of the burgh date mainly from a decision by the burgh
council to provide defences in 1547. Of
these churches only
Holy Rude and Cambuskenneth Abbey still have visible remains, though
something of the Dominican church is known from excavations. Other partly
pre-Reformation buildings include the four-arched bridge over the Forth, and
parts of the town wall. The present bridge is probably largely of the
sixteenth century, though we know that the earliest bridges here were of
timber, and a short way upstream. The remaining parts of the wall along the
south and west sides of the burgh date mainly from a decision by the burgh
council to provide defences in 1547.
- The burgh also has several early houses, including
two of the finest aristocratic town houses in Scotland. The most prestigious
situations for such houses were around the market area (now known as Broad
Street) and on the road to the castle. Mar's Wark, which commands the top
end of the market, is the surviving wing of a quadrangular Renaissance
palace started in 1570 for John, first Earl of Mar, who became Regent of the
kingdom in 1571. Argyll's Lodging, on Castle Wynd, incorporates fragments of
sixteenth-century houses, but assumed its present form in campaigns of the
1630s and 1670s for the first Earl of Stirling and the ninth Earl of Argyll.
Cowane's Hospital, on the south side of the parish church, was built as an
almshouse with money bequeathed in 1633 by the merchant John Cowane.
Cowane's family house also survives in a ruined state where the road leading
down to the bridge joins St Mary's Wynd.
- James IV's Royal Residence
Despite the inauspicious start to his reign, James IV was perhaps the
most attractive member of the Stewart dynasty, and Stirling was a principal
centre for the brilliant court which he assembled around himself. Through
the buildings he erected we see how a fortress of formidable strength could
also accommodate a sumptuous royal residence, and it was against this
background that he was able to show himself to the rest of Europe as a
prince of the Renaissance. Rather unfairly, however, his encouragement of
learning within the castle is often best remembered for his patronage of the
Italian scholar, John Damian, who undertook alchemical experiments to turn
base metals into gold. Damian is also said to have tried to fly to France
from the walls of Stirling in 1507, using wings of his own making, and to
have concluded that the inevitable result was because the hen feathers he
used had a more natural affinity with the midden than with the skies!
James IV was Scotland's greatest builder of palatial architecture, carrying
out major works at Holyrood, Edinburgh, Falkland, Linlithgow and Rothesay,
though it is at Stirling that we see the most complete expression of his
architectural ambitions. It was probably James IV who started to have the
main royal enclave of the castle, the Inner Close, laid out to the plan we
still see. He built his own residence, the King's Old Building, on the west
side of the Close, with the Great Hall facing it on the east, and he
established a college of priests as Scotland's Chapel Royal, probably within
the chapel his father had improved on the north side of the Close. He also
built the Forework, a great frontispiece containing the main entrance to the
castle. In addition, he may have remodelled an earlier range as a residence
for his queen, Margaret Tudor, around the time of their marriage in 1503,
and we must assume that he would have built much else if he had not been
killed at the Battle of Flodden in 1513 aged 40.
-
  James
V's Palace James
V's Palace
James V was crowned in the Chapel at Stirling 12 days after his father's
death, on 21 September 1513. He was only 17 months old. His subsequent
upbringing cannot have been a happy time for him, as various magnates
squabbled over control of the royal person. By the age of 16 he had
effectively established his own authority and, perhaps partly in reaction
against his English mother, his own horizons were distinctly European. As
early as 1517 it had been agreed in the Treaty of Rouen that he was to have
a French bride, though François I of France was less enthusiastic when the
time came to honour his agreement. Eventually, in 1536, James V went in
person to France to claim a bride, and was rewarded with the Princess
Madeleine, who was to die within six months of the marriage. For his second
wife he took the more robust daughter of the Duke of Guise-Lorrainc, Mary of
Guise. For his second French queen, James V built the magnificent Palace at
Stirling. A number of French details show that James had taken a close
interest in the buildings of his first father-in-law whilst visiting France,
and we also know that he had several French masons in his service. James V's
court at Stirling must have been as vibrant as that of his father, and it is
particularly pleasing to think that at least some of the exquisite church
music of Robert Carver was composed for the Chapel Royal. But the fifth
James's life was even briefer than his father's, since he died in 1542 at
the age of 30, broken by the disastrous defeat of his army by the English at
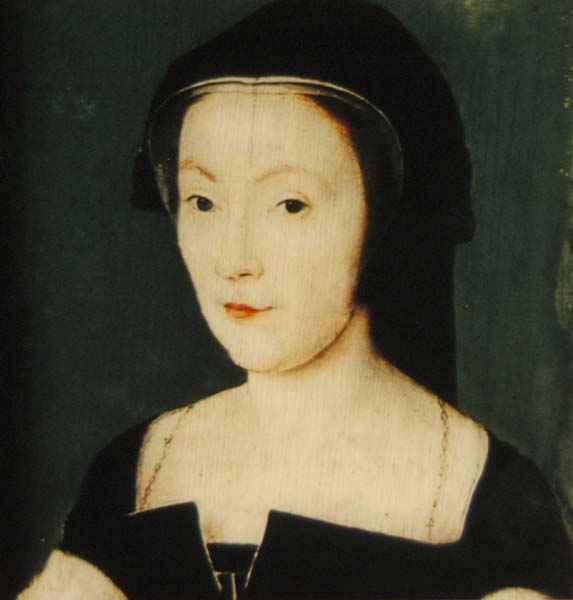
Solway Moss, leaving a female baby to succeed him.
-
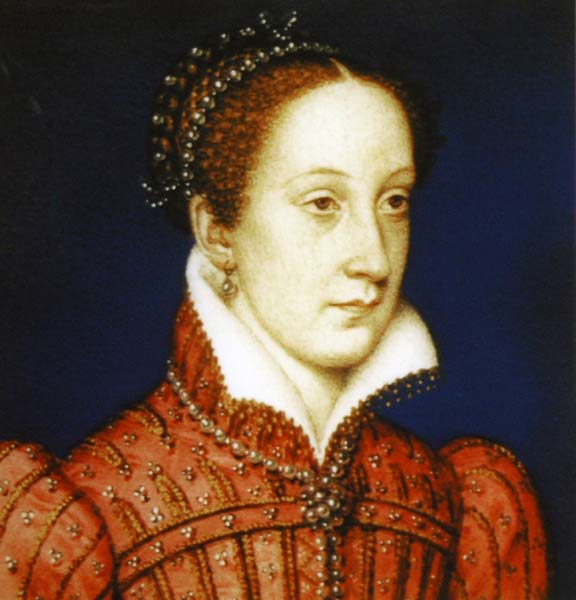 Queen
Mary Queen
Mary
Mary was crowned as Queen of Scots on 9 September 1543 within the Chapel
Royal, a ceremony said dismissively by Henry VIII of England's
representative to have been carried out with 'not very costlie' ceremonial.
Henry VIII saw the marriage of his own son, Prince Edward, to the infant
queen as his best hope of reviving English claims to Scotland, and the
marriage was agreed under the Treaty of Greenwich in 1543. But many in
Scotland doubted English assurances that Scottish independence would be
respected and by 1548, after two further phases of warfare with England, it
was decided to send the infant queen to France for marriage to the heir to
the French throne, who succeeded as François II in 1559.
During Mary's absence in France, Scotland was frequently a battleground
between those who wished the country to move towards a closer alliance with
Protestant England, and those who preferred a relationship with Catholic
France. Various major artillery fortifications were raised by both sides,
and at Stirling we now realise that, embodied within later structures, there
are significant remains of a particularly important system of outer
defences, (including the French Spur) which were almost certainly built for
Mary of Guise in the 1550s.
Mary Queen of Scots returned to her Scottish kingdom in 1561, after the
death of both her mother and her French husband, and found a country that
had become Protestant while she remained Catholic. The Chapel Royal at
Stirling was apparently the only palace chapel still fitted out for Catholic
worship; even so, at her first service within the castle her half-brother,
Lord James Stewart, together with the Earl of Argyll, physically attacked
the officiating clergy. Soon afterwards the Queen had another misfortune at
Stirling, narrowly escaping death when her bed curtains caught fire.
The happiest event associated with Mary at the castle was the baptism of her
son, Prince James, on 17 December 1566, although she was by then estranged
from her husband, Lord Darnley. After the ceremony, which was carried out
with Catholic ritual, using a golden font provided by Elizabeth I of
England, the celebrations lasted for a further two days. The second day was
largely taken up with audiences for ambassadors, while on the third there
was a lavish banquet with an Arthurian theme. The high point of the
celebrations was the allegorical siege of an enchanted castle on the open
ground in front of the castle, followed by a display of fireworks and
artillery. In all of this Mary was determined to show that Scotland could
rival the most ambitious celebrations to be seen at any of the European
courts, even if she had to borrow from the merchants of Edinburgh to pay for
it.
-
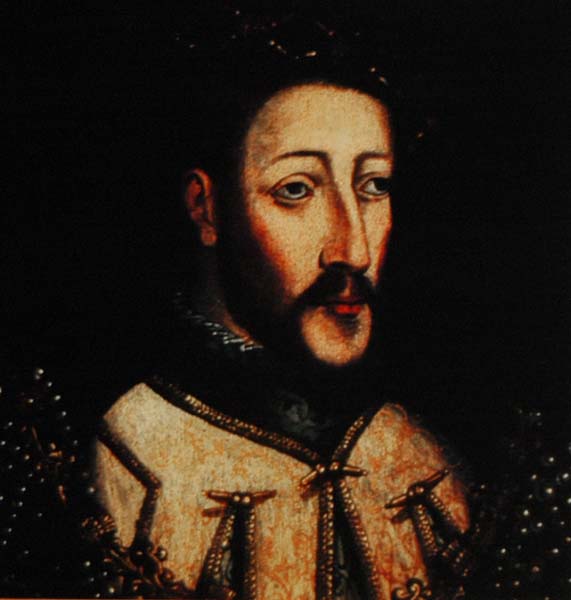
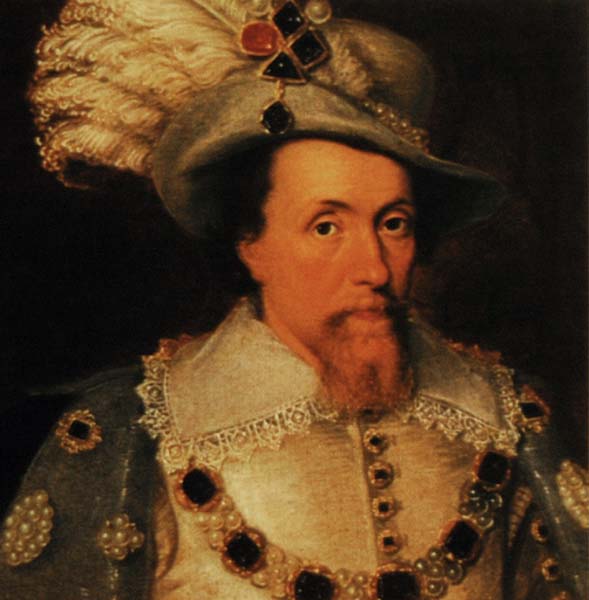 King
James VI King
James VI
Mary was forced to abdicate on 24 July 1567. She was succeeded by the
year-old James VI, who was crowned in Stirling parish church five days
later. Much of James' childhood was passed within Stirling Castle, where he
was taught by the formidable scholar, George Buchanan, who did not scruple
to advise the King what James thought about his mother. As usual with royal
minorities, James became a focus for rival factions. There were attacks on
the castle while the king was in residence in 1571 and 1578; he was taken
there as a virtual prisoner after the Ruthven Raid in 1582, and there was a
further siege in 1585.
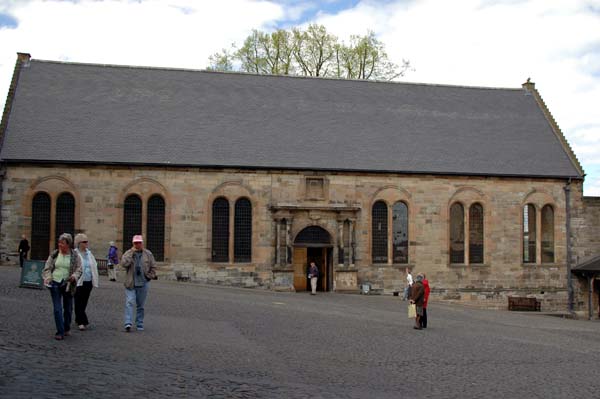
Reports on the structural state of the castle from James VI's reign suggest
that lack of maintenance had led to some buildings being in a state of
pending collapse. One of these was the Chapel Royal, which was both in a
poor state and in an inconvenient position, and James VI's chief
architectural contribution to the castle was its rebuilding to an elegant
design in 1594. The reason for this was the baptism of Prince Henry, the
first son born to James and Queen Anne of Denmark. By this stage it was
certain that the 60-year-old Elizabeth I of England would have no children,
and it was now the turn of a monarch of Scotland to have claims on the
English throne. In producing a son, and giving him a name favoured by the
English royal house, James was therefore offering the prospect of continuity
to both England and Scotland. The celebrations were duly magnificent. One of
the centrepieces of the banquet held afterwards in the Great Hall was a
splendid ship which brought in a variety of fish, and which was apparently
such a fine piece that it was preserved into the eighteenth century.
-
 James
VI's ambition to succeed to the English throne was fulfilled on the death of
Elizabeth I in 1603. On moving south he said he would make many
'homecomings' to his Scottish kingdom, but he found it surprisingly easy to
rule Scotland from England and only made one visit, in 1617. Various works
were carried out within the castle to make it suitable for that visit. Even
more was done before the visit expected from Charles I following his
succession in 1625, though it was only in 1633 that he found opportunity for
his Scottish coronation. James
VI's ambition to succeed to the English throne was fulfilled on the death of
Elizabeth I in 1603. On moving south he said he would make many
'homecomings' to his Scottish kingdom, but he found it surprisingly easy to
rule Scotland from England and only made one visit, in 1617. Various works
were carried out within the castle to make it suitable for that visit. Even
more was done before the visit expected from Charles I following his
succession in 1625, though it was only in 1633 that he found opportunity for
his Scottish coronation.
With such a reduced royal presence there was little need for major building
works at the Scottish palaces, and from this period onwards it is the
military aspect of the castle which once again became paramount. Little was
done at the time of Charles I's second visit to Scotland in 1641, when he
was at loggerheads with the Covenanting party in Scotland, and England was
on the verge of civil war. Following his execution in 1649, his son was
declared king in Scotland, as Charles II, and the English parliamentary army
came north on a punitive campaign in 1650. As part of this, General Monk
took the castle by siege in 1651, and the marks made by his artillery are
still to be seen on some buildings.
After his restoration to the English throne in 1660, Charles II had little
inclination to revisit Scotland, but did agree to rebuild Holyrood as the
Scottish royal palace in the 1670s. He also sent his brother, James Duke of
Albany and York, to Scotland at a time when his open Catholicism was causing
offence in England. James visited the castle on 3-4 February 1681, but its
buildings were in no fit state for him to stay there. The Duke succeeded to
the Scottish and English thrones as James VII and II in 1685, but was forced
to flee in 1688, being succeeded by his daughter Mary and her husband,
William of Orange. However, James VII never abdicated, and he and his son
and grandsons were to provide a focus of rival loyalty for over a century.
Their supporters were known as Jacobites, from the Latin Jacobus meaning
James.
- Jacobite Threat
No sooner had a Scottish convention proclaimed William and Mary as joint
monarchs in March 1689 than rebellion broke out under the leadership of John
Graham of Claverhouse, Viscount Dundee. Although this was eventually
suppressed, it created concern about the weakness of the Scottish castles,
and improvements were made to Stirling by closing
off two lesser entrances, and by providing artillery mountings on the more
vulnerable east side. Naturally enough, such emergency measures paid little
respect to the castle's architectural qualities, and from this point onwards
military needs were increasingly given greater weight than aesthetic
considerations.
If many Scots felt they had no part in the deposition of James VII, they
felt even more alienated after the childless Queen Anne came to the throne
in 1702 and the English parliament decided that the children of Sophia,
Electress of Hanover, were to succeed her. A further incentive to disloyalty
was the Union of the Kingdoms. Under James VI, Charles I, Charles II, James
VII and William and Mary, Scotland and England were only united by the fact
that they had the same monarch; but in 1707 it was decided that the kingdoms
should be themselves united, and the last session of the Scottish parliament
was closed on 28 April. Although James VII had died in 1701, his son, Prince
James, known as the Old Pretender, continued his family's claim to the
throne, and following the Act of Union he persuaded Louis XIV of France to
provide a fleet and army to invade Scotland. This fleet sailed into the
Firth of Forth on 23 March 1708 and, despite the fact that the anticipated
popular rising did not materialise, it was decided that the principal
castles had to be strengthened.
At Stirling the strengthening was carried out between 1708 and 1714, to the
designs of Captain Theodore Duty, the military engineer for Scotland. His
first proposals, for simply enclosing the area in front of the castle, were
criticised by Captain Obryan, a fellow engineer, and their superior, Talbot
Edwards, was called on to arbitrate. The scheme eventually
adopted incorporated parts of the outworks built for Mary of Guise in the
1550s. The progress of work may have been interrupted by John, sixth Earl of
Mar, the governor of the castle and a keen architectural connoisseur, who
wished to improve both the royal lodgings and his own accommodation.
However, Mar's involvement with the castle was soon to be ended. Following
what he regarded as a snub by the new Hanoverian dynasty, in 1715 he
instigated a rising on behalf of the deposed Stewart line, raising the
standard of the Old Pretender at Braemar on 6 September. Owing to his own
inadequacies as a general - he lost the Battle of Sheriffmuir when he should
have won it - he was soon in exile in Paris, and while there he found some
solace drawing up more elaborate schemes for remodelling the Palace for a
restored Stewart dynasty.
The new defences of the castle were tested as part of the last major
Jacobite rising, in 1745-6, led by Prince Charles Edward Stewart (Bonnie
Prince Charlie) on behalf of his father, the Old Pretender. A few shots were
fired as his army marched southwards in 1745, but on his return north in
1746 he laid siege to the castle from the adjacent Gowan Hill, only to find
that the commander of the castle, General Blakeney, made short work of his
artillery emplacements once he opened fire from the batteries created on
that side of the castle in 1689.
- Castle in Recent Times
Stirling Castle was rapidly becoming a military back-water. There was no
reason to carry out more than minimal maintenance of its great buildings,
and in 1777, for example, when part of a fine ceiling in the king's lodging
fell, the rest was simply removed. Such architecture was no longer greatly
valued, and there was little money to pay for work which was not militarily
necessary. While this may now be deemed regrettable, the more positive
aspect of the situation is that lack of interest meant there were no great
schemes of rebuilding, and adaptations were kept to the essential minimum.
 The
situation changed at the end of the century, on the outbreak of warfare with
Revolutionary and Napoleonic France. In 1794 Stirling was the rendezvous for
Campbell of Lochnell's mustering of the Duke of Argyll's Highland regiment
[one of the two component elements of what was to become the regiment of the
Argyll and Sutherland Highlanders, and which was eventually to have the
castle as its base after the two elements were united in 1881]. Soon
afterwards, there was a drive to provide accommodation at all of the major
castles, which at Stirling was achieved by inserting floors and walls in the
Great Hall to create barrack rooms. From then on, Stirling was to be home to
varying numbers of soldiers, and the castle was increasingly adapted to meet
their needs. The royal buildings - and many lesser buildings as well - had
to respond to these changed requirements, though this did at least ensure
that they were preserved. Additionally, several new buildings were raised,
from the Main Guard House and Fort Major's House in the Outer Close, to the
magazines in the Nether Bailey, and these are now valued as an integral part
of the castle's architectural history. The
situation changed at the end of the century, on the outbreak of warfare with
Revolutionary and Napoleonic France. In 1794 Stirling was the rendezvous for
Campbell of Lochnell's mustering of the Duke of Argyll's Highland regiment
[one of the two component elements of what was to become the regiment of the
Argyll and Sutherland Highlanders, and which was eventually to have the
castle as its base after the two elements were united in 1881]. Soon
afterwards, there was a drive to provide accommodation at all of the major
castles, which at Stirling was achieved by inserting floors and walls in the
Great Hall to create barrack rooms. From then on, Stirling was to be home to
varying numbers of soldiers, and the castle was increasingly adapted to meet
their needs. The royal buildings - and many lesser buildings as well - had
to respond to these changed requirements, though this did at least ensure
that they were preserved. Additionally, several new buildings were raised,
from the Main Guard House and Fort Major's House in the Outer Close, to the
magazines in the Nether Bailey, and these are now valued as an integral part
of the castle's architectural history.
But even while military requirements were met, there was growing
appreciation of the castle's architectural qualities during the nineteenth
century. By 1849 it was felt to be worth a visit by Queen Victoria, who
thought it was 'extremely grand'. It was also admired by Robert Billings,
who included views in his influential publication on the Baronial and
Ecclesiastical Antiquities of Scotland, published between 1845 and 1852.
Billings was himself called on to rebuild the damaged parts of the King's
Old Building after a fire in 1855. Nevertheless, the army's priority still
had to be the accommodation of its soldiers, though there was a shift of
emphasis after 1906, when King Edward VII asked that maintenance of the
buildings he transferred from the War Office to the Office of Works.
With the co-operation of the War Office, the change of responsibility in
1906 encouraged a more sympathetic climate for the care of the castle's
historic structures and, where possible, works were carried out in a way
that allowed their inherent qualities to be appreciated. Yet further changes
became possible when the castle ceased to be the military depot for the
Argyll and Sutherland Highlanders in 1964, though some might have felt that,
with the loss of both its monarchs and its permanent complement of soldiers,
there was a risk of the castle forfeiting something of its raison d'etre.
However, in recent years, major works of improvement have been instigated,
including the restoration of the Great Hall, and continue with the ongoing
refurbishment of the Palace.
| Source |
Stirling Castle, the official Souvenir Guide,
Historic Scotland, isbn 1 900168 96 0 |
| |